Omdat we dat ding wel helemaal mee genomen hebben... bijna nergens nodig gehad... alleen in de Gobi heeft ie ons toch mooi gered.
Links en rechts de auto na elkaar opgetild om de rijplaten onder de wielen te krijgen.
Advies is wel om eerst te oefenen zonder dat er nood is.... Het is een lomp stom ding waar je even mee moet leren werken, en onze eerste oefening midden in het zand in de grote Gobi woestijn in Mongolië is daar niet geschikt voor. Oh ja, wij zaten dus volledig vast en stukje weggezonken, midden in die zand woestijn, in de erg plakkerige kleiachtige modderplaten, waarbij je even blijft staan voor de korst breekt om vervolgens weg te zakken tot je knie. Nou dat schopt niet lekker...

Dus ook voor onszelf: uitleg hoe werk ik met de hi lift jack !
Wij hebben bij ons: Hi-Lift, Off road base, Lift-mate dus de grote krik, plank waar ie op staat, en twee haken om aan het wiel te trekken.
Hij hangt bij ons aan de voorbumper. Trilde soms wel, daarvoor bestaan Handle-keepers maar een tie-wrap en klittenband erom heen werkte ook goed. En een Jack protector is een leuke hoes.
Natuurlijk hebben we ook een gewone hydraulische krik bij ons, een bottle lift jack. Voor midden op het asfalt een lekke band te wisselen met lange stang om niet onder de auto te moeten liggen tijdens het krikken.
Air jack of luchtzak krik hebben we ook overwogen, maar niet meegenomen. Deze leg of graaf je onder de auto en sluit hem aan op de uitlaat.
Bij het gebruik van de hi jack is het belangrijk, staat in de handleiding, dat je de wielen tegen wegrollen blokkeert. Nou, wij zaten met alle vier diep vast in de mud, dus.
En veel WD40 gebruiken, ook erg belangrijk. Of lomp geweld... maar let op je omgeving...
Oh ja, van andere reizigers gehoord, die het ding wel vaak gebruikt hebben in Afrika... De goedkope chinese versie... die redt het niet. Krak.
Hieronder de handleiding en instructie voor het gebruik van de hi lift jack.
OPERATING INSTRUCTIONS hi-lift
RAISING A STATIONARY LOAD
1. Securely chock and block (stabilize) the load you are going to lift.
This will prevent it from rolling or shifting as you lift it.
2. Keep the handle against the steel standard (bar) with the handle
clip holding it when not lifting or lowering.
3. Place the Jack's base plate securely on a firm, level, and dry
surface with the steel standard (bar) pointing straight up.
4. Lift the reversing latch until it locks in the UP position.
5. Grasp the handle or the handle socket and raise the lifting
mechanism until the nose is completely and securely under the
load.
6. Grasp the handle firmly with both hands. Carefully pump the
handle up and down to raise the load. Do not use an extension on
the handle.
7. Always place the handle against the steel standard (bar) with the handle clip
holding it up before moving the reversing latch. This will prevent the handle
from moving up and down rapidly, which could cause serious injury or death if it
comes into contact with any part of your body. Always keep your head out of
the travel path of the handle.
8. The load will be raised on each down stroke of the handle.
Watch the load and the Jack carefully. Stop Jacking if either one starts to move. Do not continue raising the load unless it is safe to do so. When safe, stabilize and block the load.
9. When the load is raised to the desired height. place the handle in the upright clipped
position against the steel standard (bar).
10. Block the load securely.
11. Lower the load onto the blocks.
LOWERING A LOAD
Lowering the load can be dangerous. Keep your head clear of the path of the
handle. During lowering, the weight of the load pushes UP against the Jack's
handle. lf your hands slip off the handle, or if the handle is horizontal when
you move the reversing latch, it may move up very quickly. lf your head is in
the handle's travel path, it could strike you, causing serious injury or death.
IMPORTANT:
The Jack must have a load on it (150 pounds or more) to lower step-by-step.
Otherwise, the lifting mechanism will slide down to the base plate, "dropping"
your load.
1. Before you move the reversing latch down, clip the handle in the upright position
against the steel standard (bar).
2. Move the reversing latch to the DOWN position.
3. Grasp the handle firmly with both hands. Carefully pump the handle up and down
to begin lowering the load.
4. The load will be lowered on each UP stroke of the handle. lf the Jack binds, use WD40 and clean it.
WINCHING OR CLAMPING WITH THE JACK
You may use this Jack as a winch or clamp.
For Winching.
Make sure the top clamp is in line with the bar. lnstall one end
of a chain or tow strap securely to the object to be winched,
and securely attach the other end of the chain or tow strap to
the top clamp of the Jack. Use a shackle if the chain or tow
strap will not fit through the Top Clamp of the Jack. Take
another chain or tow strap and secure one end to a fixed,
stable object, and the other end around the lifting nose on the
Jack (do not attach chain or shackle to bottom hole of the lifting
nose). lf the fixed object is a tree, follow Tread Lightly principles
and use a tree strap.
Operate the Jack as you would for raising or lowering a load.
For Glamping:
Loosen the top clamp bolt. Turn the top clamp 90" to the steel bar, and
retighten the bolt. You can connect the top clamp anywhere along the steel
standard (bar) to use the Jack as a clamp. Operate the Jack as you would for
raising a load.
Hieronder het lieren met de hi jack nog beter uitgelegd.
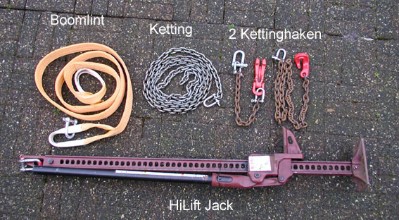
Benodigdheden:
Boomlint;
Ketting (7mm);
2 kettinghaken met stuk
ketting.
HiLift Jack
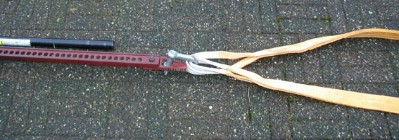
Het boomlint wordt rond
een vast steunpunt gelegd
en bevestigd aan de
bovenkant van de Hilift.
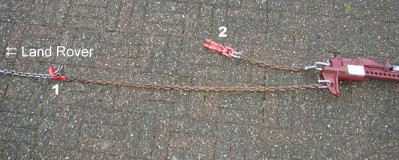
De ketting wordt aan de
ene zijde bevestigd aan
de auto en aan de andere
zijde wordt kettinghaak 1
ingehaakt.
Het takelen kan beginnen.
Als de Hilift op zijn
maximum zit, wordt
kettinghaak 2 ingehaakt
om het gewicht over te
nemen ....
(zoals je ziet is de voet van
de Hilift verwijderd)
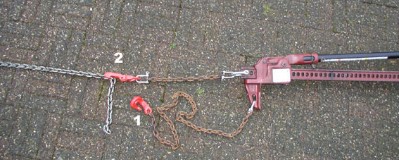
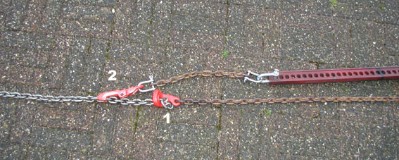
.... de Hilift wordt in de
onderste stand gebracht,
haak 1 kan weer ingehaakt
worden en het takelen
kan herbeginnen.
Bij het gebruik van je Hi-lift als lier moet altijd aan het eind van het werkzame gebied van de lift de auto borgen. Normaal gebeurd dit door een tweede kabel aan de auto te bevestigen die hem op z'n plaats houdt wanneer je de lierkabel of ketting moet losnemen. De kettinghaak neemt de functie (borgen) van de tweede kabel over. Borgen moet dus altijd als je verder moet lieren dan de lengte van je Hi-lift.
.


